Your safe box is more than just a metal container; it’s a fortress for your most cherished possessions, from important documents to invaluable heirlooms. Yet, an unanchored safe, regardless of its weight, remains a potential vulnerability in the face of determined intruders or unexpected events. You might be surprised how easily even a heavy safe can be moved or tipped if not properly secured. Bolting down your safe to the floor transforms it from a mere storage unit into an immovable bastion, significantly enhancing its resistance to theft and offering unparalleled peace of mind. This comprehensive DIY guide will walk you through every step to safely and effectively secure your safe box, protecting your valuables with a professional-grade installation.
Why Bolting Down Your Safe Box is Essential
Securing your safe box to the floor is a critical step in safeguarding your assets and ensuring your family’s safety. It’s not just an added measure; it’s a fundamental aspect of safe ownership that can deter criminals, protect against accidents, and even meet specific compliance requirements.
Enhanced Security Against Theft
|
Our Picks for the Best Safe Box in 2026
As an Amazon Associate I earn from qualifying purchases.
|
||
| Num | Product | Action |
|---|---|---|
| 1 | SentrySafe Black Fireproof and Waterproof Safe, File Folder and Document Box with Key Lock, Ex. 14.3 x 15.5 x 13.5 inches, HD4100 |

|
| 2 | KYODOLED Fireproof Document Box with Key Lock, Small Lock Boxes for Personal Items, Fire and Water Resistance, Fireproof Safe Box for Documents, Jewelry, Passport, Cash, 12.6'' x 8.3'' x 4.3'' Black |
|
| 3 | Amazon Basics Steel Home Security Safe Box with Electronic Keypad Lock for Documents, Jewelry, Valuables, 1.8 Cubic Feet, Black, 13.8"W x 13"D x 19.7"H |
|
| 4 | KYODOLED Cash Box with Combination Lock Safe Metal Money Box with Money Tray for Security Lock Box 7.87"x 6.30"x 3.35" Black |
|
| 5 | SentrySafe Fireproof Safe with Key Lock, Chest Lock Box for Home or Travel Secures Money, Documents, 0.18 Cubic Feet, 6.1 x 14.3 x 11.2 Inches, 1210 |
|
| 6 | Yuanshikj Safe Box with Key Lock, Steel Security Lock Box, 0.23 Cubic Feet, 9.1" W x 6.7" D x 6.7" H, Small Hidden Safe for Home Office Cash Jewelry Storage (BLACK) |
|
| 7 | DocSafe 5200°F Document Organizer with Lock, Upgraded Heat Insulated Fireproof&Water-Resistant Box 8 Layers File Organizer, Portable Home Travel Safe Storage for Important Documents and More |
|
| 8 | Amazon Basics Steel Security Safe and Lock Box with Digital Keypad, Easy to Use, Removable Shelf, Secure Cash, Jewelry, Documents, Black, 1.2 Cubic Feet, 16.9-x-14.6-x-10.6-inches (WxDxH) |
|
| 9 | Amazon Basics Steel Security Safe and Lock Box with Electronic Keypad, Secure Documents Storage, Black, 0.5 Cubic Feet, 13.8" W x 9.8" D x 9.8" H, Removable Shelf |
|
| 10 | SentrySafe Fireproof Safe Box with Key Lock, Chest Safe with Carrying Handle to Secure Money, Jewelry, Documents, 0.25 Cubic Feet, 6.3 x 15.3 x 12.1 Inches, 1160 |
|
One of the primary reasons to bolt down your safe is to prevent its removal. Thieves often target unanchored safes, as they can simply use a dolly or brute force to wheel them away and open them at a more convenient, private location. A bolted-down safe forces intruders to work on-site, under pressure, with limited leverage, significantly increasing the time and noise required for an attempt, making them far more likely to abandon the effort altogether. This immovable barrier makes your safe a much less appealing target.
Protection from Accidental Tip-Overs
Beyond theft, an unanchored safe, especially a tall or heavy one, poses a significant safety hazard. Opening a heavy door, particularly on uneven flooring, can cause the safe to tip forward, potentially leading to serious injury or damage to your property and its contents. Bolting the safe to the floor ensures its stability, preventing accidental tip-overs, which is crucial in homes with children or pets where such an incident could be catastrophic.
Compliance and Peace of Mind
In some cases, specific regulations, such as firearm storage laws, or insurance policies may mandate that safes be bolted down. Meeting these requirements not only keeps you compliant but also provides an invaluable sense of security. Knowing your valuables are protected by an immovable safe allows you to rest easy, confident that you’ve taken every possible step to secure what matters most.
Tools and Materials You’ll Need
Before you begin, gathering the right tools and materials is crucial for a smooth and successful installation. Having everything ready will streamline the process and ensure you can tackle the job safely and effectively.
Essential Tools for the Job
To properly bolt down your safe, you’ll need a few key pieces of equipment. For concrete floors, a rotary hammer drill is indispensable, offering the power needed to penetrate tough surfaces efficiently. You’ll also need masonry drill bits of the appropriate diameter and length, matching your chosen anchor bolts. For wood floors, a standard power drill and wood drill bits will suffice. A wrench or socket set will be necessary for tightening the bolts, and a vacuum cleaner or shop vac is vital for clearing dust and debris from drilled holes. Don’t forget a marking tool (pencil or marker) to pinpoint drilling locations and safety gear, including gloves, safety glasses, and ear protection, to protect yourself during the process.
Choosing the Right Anchor Bolts
Selecting the correct anchor bolts is paramount for secure installation, and the best choice often depends on your flooring type.
-
For Concrete Floors:
- Wedge Anchors: These are common and highly effective. They consist of a threaded bolt with an expandable sleeve that grips the concrete as the nut is tightened, providing excellent holding power for heavy-duty applications.
- Sleeve Anchors: Versatile and easy to install, sleeve anchors work by expanding against the drilled hole as they are tightened, suitable for various concrete and masonry applications.
- Concrete Screw Anchors (e.g., Tapcon): These self-tapping screws are highly regarded for their strength and ease of removal if you ever need to relocate your safe. They create their own threads in the concrete, offering a superior hold.
- Drop-in Anchors: These internally threaded anchors are inserted flush into a pre-drilled hole and then expanded with a setting tool, ideal for situations where you might need to remove the bolt itself later.
- Chemical/Epoxy Anchors: For maximum security and a permanent bond, chemical anchors involve injecting a specialized adhesive into the drilled hole before inserting the bolt. This creates an exceptionally strong, chemical bond.
-
For Wood Floors:
- Lag Screws: These heavy-duty screws are designed to be driven directly into wood floor joists or thick subflooring, providing a strong mechanical connection.
- Carriage Bolts: For superior security with wood floors, especially if you have access to the underside of the floor, carriage bolts can be fed through the floor from below and secured with a nut inside the safe, making them nearly impossible to remove from above.
Ensure your chosen bolts are long enough to penetrate the flooring significantly and match the diameter of your drill bits for a snug fit.
Other Useful Supplies
Consider having composite shims on hand if your floor is uneven. These can be placed under the safe to create a level, stable base, preventing wobbling and ensuring the safe sits flush against the floor. While not strictly necessary, touch-up paint can be useful for minor cosmetic repairs to the safe or floor after installation.
Preparing Your Safe Box and Location
Proper preparation is the cornerstone of a successful safe installation. Taking the time to select the ideal location and ready your safe will save you headaches down the line.
Choosing the Right Spot
The location you choose for your safe is paramount for both security and practicality. Opt for a discreet, secure area in your home, such as a closet or basement, where it’s less visible to potential intruders. Crucially, the floor beneath the safe should be solid. Concrete is generally considered the most secure base for anchoring, offering the best grip for anchor bolts. If you have wood floors, ensure you can locate floor joists for a robust connection. Always verify that there are no hidden pipes, electrical wiring, or HVAC ducts beneath your chosen spot that could be damaged during drilling. A stud finder or calling a professional can help you avoid costly mistakes. Also, consider the safe’s door swing and ensure it has ample space to open fully without obstruction once installed.
Emptying and Positioning the Safe
Before any drilling begins, completely empty your safe of its contents. This not only makes the safe lighter and easier to move but also protects your valuables from dust and potential damage during the installation process. Once empty, carefully position the safe in its final intended location. Take your time to ensure it’s perfectly aligned and level. If your floor is uneven, use shims to stabilize the safe, preventing any rocking or instability. This pre-positioning is crucial because you’ll use the safe’s existing bolt-down holes as a template for drilling into the floor.
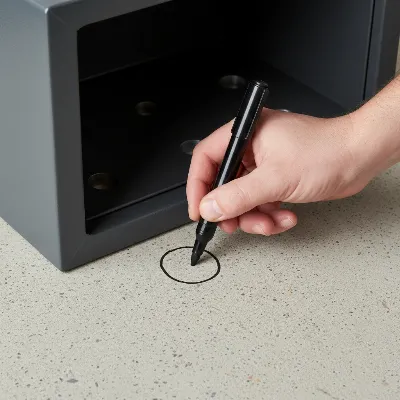 A person using a marker to mark drilling points through pre-drilled holes inside a safe box.
Step-by-Step Guide: Bolting Down Your Safe Box
Now that you’re prepared, let’s get down to the hands-on process of bolting your safe box firmly to the floor. Follow these steps carefully for a secure installation.
Step 1: Mark Drilling Points
Most safes designed for anchoring come with pre-drilled holes in their base. These are your guides. Once your safe is precisely positioned and leveled, open the door and use a pencil or marker to mark the exact locations on the floor through these holes. If your safe is too small to comfortably fit a drill inside or doesn’t have accessible interior holes, you may need to mark the spots, then carefully move the safe aside to drill. Some safes may require drilling through diagonal feet on the bottom, as instructed by the manufacturer.
Step 2: Drill Pilot Holes
This is a critical step that requires precision. First, ensure you have the correct drill bit. For concrete, you’ll need a masonry bit (or a carbide-tipped masonry bit for hammer drills) that matches the diameter of your anchor bolts. For wood, use a wood drill bit that is slightly smaller than your lag screws to allow them to bite effectively. Attach the appropriate bit to your drill. Drill holes into the marked spots, aiming for a depth that is slightly greater than the length of your chosen anchor bolts. Most bolt packaging will specify the required hole depth. Drill slowly and steadily, applying firm, consistent pressure. If drilling into concrete, use a hammer drill for optimal efficiency. After drilling, use a vacuum cleaner or shop vac to thoroughly clear all dust and debris from the holes. Clean holes are essential for the anchors to grip effectively.
Step 3: Install Anchor Bolts (if required before safe positioning)
Depending on the type of anchor bolts you’re using, you might need to install part of the anchor before repositioning the safe. For example, drop-in anchors are driven flush into the concrete and then expanded with a setting tool at this stage. Chemical anchors involve injecting epoxy into the hole before the bolt is inserted. If you are using wedge anchors or concrete screw anchors, you will typically insert them through the safe in the next step. Always consult the specific instructions for your anchor type.
Step 4: Secure the Safe Box
Carefully reposition the safe over the newly drilled holes, aligning the pre-drilled holes in the safe’s base with the holes in the floor. Ensure a perfect match. Insert your chosen anchor bolts through the holes inside the safe and into the floor. For wedge anchors or sleeve anchors, you might need to tap them gently with a hammer to get them fully seated into the holes. Add washers and nuts to each bolt. Using your wrench or socket set, begin to tighten the nuts evenly. It’s important to tighten them gradually and in rotation (like tightening lug nuts on a car tire) to ensure the safe is pulled down flush and level to the floor without warping or straining the safe’s base. Tighten until the safe is firmly secured and no longer moves or wobbles.
Step 5: Final Check
Once all bolts are tightened, give your safe a firm push and pull in multiple directions to test its stability. It should feel completely solid and immovable. Check that the safe door opens and closes smoothly. If the floor is slightly uneven or the safe is not perfectly flush, you may need to slightly adjust the tension on one or more bolts, or add shims if you haven’t already. Ensure there’s no space for a pry bar to be inserted underneath the safe. Your safe is now securely bolted down, providing a robust layer of protection for your valuables.
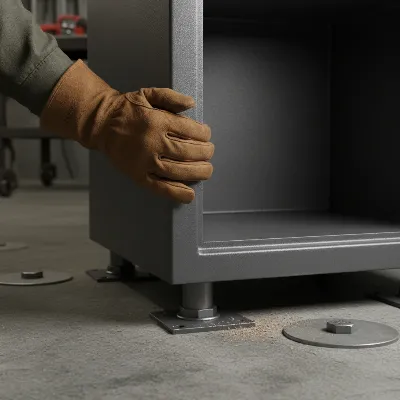 A close-up of a securely bolted down safe box on a concrete floor with a person testing its stability.
Common Challenges and Troubleshooting
Even with careful planning, DIY projects can present unexpected hurdles. Knowing how to address common issues can make your safe bolting experience smoother.
Drilling into Difficult Surfaces
Concrete: Drilling into concrete, especially old or reinforced concrete, can be challenging. If your drill seems to be struggling, ensure you’re using a rotary hammer drill with a sharp masonry bit of the correct size. Apply consistent, firm pressure and allow the drill to do the work, rather than forcing it. If you hit rebar, you may need to slightly adjust the drill location or use a specialized rebar-cutting bit.
Uneven Floors: If your safe wobbles even slightly after initial placement, you’ll need shims. Carefully lift the safe just enough to slide composite shims under the low spots until the safe is perfectly level and stable. Then proceed with marking and drilling. Proper leveling ensures the door operates correctly and prevents stress on the safe’s structure and the bolts.
Over-tightening or Under-tightening Bolts: Over-tightening can strip threads or damage the safe/floor, while under-tightening compromises security. Tighten bolts until they are snug and the safe is immovable, but avoid excessive force. A good rule of thumb is to tighten until there is no movement, then give it a small extra turn. If you have a torque wrench, follow the manufacturer’s recommendations for anchor bolts.
Dealing with Obstructions
Before drilling, always conduct a thorough check for pipes, electrical wiring, or other utilities beneath your floor. This can involve using a stud finder with metal detection capabilities, reviewing building plans, or consulting a professional. Drilling into these can cause significant damage, injury, or electrical shock. If you detect an obstruction, adjust the safe’s position slightly to avoid it, or seek professional advice.
> “The security of your safe is not just about its build quality, but how it’s integrated into your home. A properly anchored safe is exponentially more effective at protecting your valuables than one simply placed on the floor.” – John Davis, Certified Safe Technician, Reviewerzz.com
Safety Precautions During Installation
Your safety is paramount during any DIY project. Adhering to these precautions will help prevent accidents and ensure a smooth installation process.
Personal Protective Equipment (PPE)
Always wear appropriate PPE. Safety glasses are essential to protect your eyes from flying debris, especially when drilling into concrete. Ear protection (earmuffs or earplugs) is critical when using noisy power tools like hammer drills, as prolonged exposure can lead to hearing damage. Work gloves will protect your hands from abrasions, splinters, and blisters, and can improve grip on tools.
Electrical and Structural Safety
Before drilling, always check for hidden electrical wires or plumbing lines in the floor. As mentioned earlier, a stud finder, a metal detector, or even consulting building plans can help you identify potential hazards. Never drill blindly into a floor or wall without verifying what lies beneath. If you are drilling on an upper floor, be mindful of the maximum drilling depth to avoid compromising the structural integrity of the ceiling below.
Lifting and Moving Heavy Safes
Safe boxes can be extremely heavy. Attempting to lift or move a large safe by yourself can result in serious injury. Always enlist the help of another person or use proper lifting equipment, such as a heavy-duty dolly or furniture straps, to maneuver the safe into position. Lift with your legs, not your back, and take breaks as needed.
Ventilating Work Area
Drilling into concrete or wood can generate a significant amount of dust. Ensure your work area is well-ventilated to avoid inhaling fine particles, which can be harmful to your respiratory system. Use a vacuum cleaner to remove dust as you drill and consider wearing a dust mask, especially in enclosed spaces.
Conclusion
Bolting down your safe box is a straightforward yet profoundly effective DIY project that significantly enhances the security of your home and the protection of your valuables. By preventing easy removal and making forced entry far more challenging, an anchored safe offers a formidable defense against theft. Beyond security, it provides crucial stability, safeguarding your family from potential tip-over accidents. With the right tools, careful preparation, and a methodical approach, you can confidently undertake this task yourself. Don’t leave your cherished possessions vulnerable; take the proactive step to bolt down your safe today and enjoy the unparalleled peace of mind that comes with knowing your sanctuary is truly secure. What valuable items are you ready to protect with a securely anchored safe?
Câu Hỏi Thường Gặp
Can I bolt down a safe to a wooden floor?
Yes, you can bolt a safe to a wooden floor, but it requires different anchor types like lag screws or carriage bolts, preferably driven into floor joists for maximum security. Ensuring the wood subfloor is thick enough and strategically locating joists is key for a strong hold.
What kind of drill bit do I need for concrete?
For concrete floors, you will need a masonry drill bit, specifically a carbide-tipped masonry bit if you are using a hammer drill, which is highly recommended for concrete. Ensure the drill bit matches the diameter of your chosen anchor bolts.
How many bolts are needed to secure a safe?
The number of bolts typically depends on the size of the safe and manufacturer recommendations. Small handgun safes might use two anchor points, while larger rifle safes usually require a minimum of four, ideally through both the base and back wall if applicable. Always refer to your safe’s manual.
Will bolting down my safe affect its fire rating?
It is crucial to follow your safe’s manufacturer instructions. Never drill through the back or sides of a fireproof safe unless specifically indicated by pre-drilled holes, as this can compromise its fireproofing abilities. Always drill only through the designated holes in the bottom feet or base.
What if my floor is uneven?
If your floor is uneven, you should use composite shims to level the safe before bolting it down. This ensures the safe sits flush against the floor, preventing wobbling and making it harder for thieves to pry underneath. Proper leveling also ensures the door mechanism functions correctly.
Can I move the safe after it’s bolted down?
While bolts like Tapcons or concrete screw anchors are designed for easier removal, relocating a bolted-down safe is generally a more involved process. It requires unbolting, often leaving holes in the floor, and potentially patching. Consider the long-term placement before bolting it down.
Is professional installation necessary for bolting down a safe?
While many homeowners can successfully bolt down a safe as a DIY project, a professional installer has specialized tools and expertise to ensure optimal security, especially for very heavy safes or complex flooring types. For peace of mind or if you’re unsure, professional installation is always an option.