Digital safe boxes offer unparalleled convenience and security, but their effectiveness hinges on keeping your access code private and up-to-date. Whether you’ve just purchased a new safe, want to update an old code, or need to assign a new user, knowing how to change the code efficiently is crucial. This guide will walk you through the simple steps to reprogram your digital safe, ensuring your valuables remain protected with a fresh, secure combination.
Understanding Your Digital Safe Box
Digital safe boxes come in various forms, but their core function revolves around an electronic keypad that controls the locking mechanism. Unlike traditional mechanical safes that rely on dials, digital safes use a numerical code, often coupled with a confirmation button, to grant access. They typically run on batteries and may include emergency override keys or external battery packs for situations where the internal power fails or the code is forgotten.
Why Change Your Safe’s Code?
|
Our Picks for the Best Safe Box in 2026
As an Amazon Associate I earn from qualifying purchases.
|
||
| Num | Product | Action |
|---|---|---|
| 1 | SentrySafe Fireproof Safe with Key Lock, Chest Lock Box for Home or Travel Secures Money, Documents, 0.18 Cubic Feet, 6.1 x 14.3 x 11.2 Inches, 1210 |

|
| 2 | Yuanshikj Safe Box with Key Lock, Steel Security Lock Box, 0.23 Cubic Feet, 9.1" W x 6.7" D x 6.7" H, Small Hidden Safe for Home Office Cash Jewelry Storage (BLACK) |
|
| 3 | KYODOLED Fireproof Document Box with Key Lock, Small Lock Boxes for Personal Items, Fire and Water Resistance, Fireproof Safe Box for Documents, Jewelry, Passport, Cash, 12.6'' x 8.3'' x 4.3'' Black |
|
| 4 | Amazon Basics Steel Home Security Safe Box with Electronic Keypad Lock for Documents, Jewelry, Valuables, 1.8 Cubic Feet, Black, 13.8"W x 13"D x 19.7"H |
|
| 5 | SentrySafe Fireproof Safe Box with Key Lock, Chest Safe with Carrying Handle to Secure Money, Jewelry, Documents, 0.25 Cubic Feet, 6.3 x 15.3 x 12.1 Inches, 1160 |
|
| 6 | Amazon Basics Steel Security Safe and Lock Box with Digital Keypad, Easy to Use, Removable Shelf, Secure Cash, Jewelry, Documents, Black, 1.2 Cubic Feet, 16.9-x-14.6-x-10.6-inches (WxDxH) |
|
| 7 | Amazon Basics Steel Security Safe and Lock Box with Electronic Keypad, Secure Documents Storage, Black, 0.5 Cubic Feet, 13.8" W x 9.8" D x 9.8" H, Removable Shelf |
|
| 8 | DocSafe 5200°F Document Organizer with Lock, Upgraded Heat Insulated Fireproof&Water-Resistant Box 8 Layers File Organizer, Portable Home Travel Safe Storage for Important Documents and More |
|
| 9 | SentrySafe Black Fireproof and Waterproof Safe, File Folder and Document Box with Key Lock, Ex. 14.3 x 15.5 x 13.5 inches, HD4100 |
|
| 10 | KYODOLED Cash Box with Combination Lock Safe Metal Money Box with Money Tray for Security Lock Box 7.87"x 6.30"x 3.35" Black |
|
Changing your safe’s code is more than just a routine task; it’s a fundamental aspect of maintaining optimal security. There are several compelling reasons to update your code regularly. Firstly, if you’ve recently acquired a new safe, it’s essential to change the factory-set default code immediately, as these are often publicly known or easily guessed. Secondly, if multiple people have access to your safe, such as in a business setting or a shared household, updating the code when someone leaves ensures continued security. Lastly, regularly changing your code, even if no one else knows it, adds an extra layer of protection against potential breaches and keeps your security practices robust.
Preparing to Change Your Safe Box Code
Before you begin the code-changing process, a few preparatory steps can save you time and prevent potential lockouts. Taking these precautions ensures a smooth and secure transition to your new code.
Gather Necessary Information
Always have your safe’s owner’s manual handy. This document is your most valuable resource, containing specific instructions tailored to your safe’s model, including how to enter programming mode, the length of the new code, and any brand-specific quirks. If you’ve misplaced the physical manual, many manufacturers offer downloadable versions on their websites. Additionally, ensure you know your current user code or the factory default code (if it’s a new safe) and any master codes, as these are often required to initiate the reprogramming sequence.
Safety Precautions
The golden rule when changing your safe’s code is to always keep the safe door open until you have successfully tested and confirmed the new code. This critical step prevents accidental lockouts. Imagine entering a new code incorrectly, closing the door, and then realizing you can’t open it—a frustrating and potentially costly mistake. With the door open, you can freely experiment with the new code multiple times, ensuring it works perfectly before securing your valuables. Also, make sure your safe has fresh batteries to avoid power-related interruptions during the programming process.
General Steps to Change a Digital Safe Box Code
While specific button sequences may vary by manufacturer, the underlying principle for changing a digital safe code remains largely consistent. Following these general steps will guide you through the process for most models.
Step 1: Accessing the Programming Mode
To initiate a code change, you first need to put your safe into “programming mode.” This is typically done by pressing a designated button, often labeled “Reset,” “Program,” “P,” or “Enroll.” This button is usually located inside the safe, either on the back of the door, near the hinges, or sometimes within the battery compartment. On some models, you might need to press a specific key on the keypad (like “*” or “#”) a certain number of times, or hold it down until you hear a beep or see a light illuminate on the keypad, indicating that the safe is ready to accept a new code.
Step 2: Entering Your Current Code (If Required)
Depending on your safe’s model and security features, you might be prompted to enter your existing code immediately after entering programming mode. This acts as a security measure to ensure that only authorized users can change the combination. If your safe requires this, carefully input your current user code and then press the confirmation button (often “#” or “Enter”). If it’s a brand new safe and you’re changing the factory code, this step might be skipped, or the factory code itself will serve as the “current code.”
Step 3: Inputting Your New Code
Once the safe acknowledges that it’s in programming mode (usually indicated by an illuminated light or a series of beeps), you’ll have a short window (often 5-20 seconds) to input your desired new code. Choose a code that is both strong and memorable, typically between 3 and 8 digits. Avoid easily guessed combinations like birthdays, anniversaries, or sequential numbers. After entering your new code, press the confirmation button, usually “#”, “Enter”, “A”, or “B”, depending on your safe model. Many safes will then require you to re-enter the new code a second time for verification.
Step 4: Verifying the New Code
This is the most crucial step before closing your safe. With the door still open, test your newly programmed code several times. Input the new code, press the confirmation button, and then turn the handle or knob as if you were opening it. The safe should unlock smoothly each time. If it doesn’t, do not close the door. Repeat the programming process from the beginning, double-checking each step. Only when you are absolutely confident that the new code works consistently should you close and lock your safe.
Specific Procedures for Popular Digital Safe Box Brands
While the general steps provide a good framework, specific manufacturers often have unique programming sequences. Consulting your user manual is always recommended, but here are common procedures for some popular digital safe box brands.
SentrySafe Digital Safe Code Change
SentrySafe models are very popular and often have a straightforward process, though it can vary slightly between series (e.g., Fire Safes, Security Safes).
- Open the Safe Door: Ensure the safe door is fully open.
- Locate the Program/Reset Button: On many SentrySafe models, this is a small red or black button found on the inside of the safe door, usually near the hinges or within the battery compartment. For some models, there might be a “P” button on the keypad itself.
- Press the Button: Press and hold the “Program” or “Reset” button until you hear a beep or see a yellow LED light illuminate on the keypad. For models with a “P” button, you might press “P” then enter the factory code.
- Enter New Code: Within a few seconds (often 5-20), enter your desired new 2-8 digit code.
- Confirm New Code: Press the “#” key or a designated confirmation button. For some SentrySafes, you may need to re-enter the new code for confirmation.
- Test: With the door open, test the new code multiple times before closing the safe.
> “Always keep your safe door open while changing the code. This prevents accidentally locking yourself out if the new code isn’t set correctly.” – John D. Smith, Certified Safe Technician
AmazonBasics Digital Safe Code Change
AmazonBasics safes are known for their user-friendliness and typically follow a similar reset procedure.
- Open the Safe Door: Have the safe door open.
- Locate the Red Reset Button: This button is usually found on the inside of the safe door, near the hinges, often behind the battery compartment cover.
- Press the Reset Button: Press the red reset button. The yellow light on the keypad should illuminate, indicating it’s ready. Some models might emit two beeps.
- Enter New Code: Input your desired 3 to 8 digit passcode on the electronic keypad.
- Confirm New Code: Press the “#” button. The green light will flash, confirming the new code is set.
- Test: Crucially, test your new passcode with the door open to ensure it works correctly before closing the safe.
Other Digital Safe Box Brands
For other brands, the process often involves variations of the steps mentioned:
- Initial Key Combination: Some safes require pressing a specific key, like “0” six times, then the existing code, followed by the new code twice.
- Asterisk/Pound Key: The “*” or “#” keys are frequently used to initiate programming or confirm codes.
- Manager/User Codes: Some safes support multiple user codes and a manager code, each with its own programming sequence.
- Battery Compartment Button: The reset button might be hidden inside the battery compartment.
Refer to your specific model’s manual for the exact steps, as even within a single brand, procedures can differ.
Troubleshooting Common Code Change Issues
Even with careful planning, you might encounter issues when changing your safe’s code. Knowing how to troubleshoot these common problems can help you regain access or successfully set your new combination.
Forgetting the Current Code
Forgetting your current code is a common predicament. If you find yourself in this situation, here are your options:
- Override Key: Most digital safes come with an emergency override key. Locate the keyhole (often hidden behind a removable panel or cover on the keypad), insert the key, and turn it to open the safe.
- Master Code: Some safes have a pre-set master code that can open the safe even if the user code is forgotten. Check your manual for this.
- Factory Reset Button: Certain safes have an internal reset button that, when pressed with the door open, can revert the safe to a factory default code or allow you to set a new one. Again, consult your manual.
- Contact Manufacturer/Locksmith: If all else fails, contact the safe’s manufacturer directly. You will likely need to provide proof of ownership (serial number, purchase receipt) to obtain assistance or a replacement key/code. A professional locksmith specializing in safes can also help open or reprogram your safe.
Safe Not Accepting New Code
If your safe isn’t accepting the new code you’re trying to set, consider these possibilities:
- Incorrect Sequence: You might have pressed the buttons in the wrong order or missed a confirmation step. Review your manual and carefully follow the steps again.
- Weak Batteries: Low batteries can lead to erratic keypad behavior. Replace the batteries with fresh, high-quality alkaline ones.
- Time Limit Exceeded: Many safes have a short time window (e.g., 5-20 seconds) to enter the new code after entering programming mode. If you take too long, the mode might time out.
- Code Length: Ensure your new code adheres to the required length (e.g., 3-8 digits).
- Multiple Beeps/Lights: Pay attention to the safe’s auditory and visual cues (beeps, flashing lights) as they often indicate success or failure of a step.
Safe Locked Out After Too Many Attempts
Most digital safes have a lockout feature that activates after several incorrect code entries (e.g., 3-5 times). This is a security measure to prevent unauthorized access.
- Waiting Period: If your safe locks out, you typically need to wait a specific period (often 5-10 minutes) before the keypad becomes active again. During this time, a red light might flash slowly. Do not attempt to enter more codes during the lockout period, as this might reset the timer or extend the lockout.
- Battery Check: Ensure the batteries are not low, as this can sometimes mimic a lockout state.
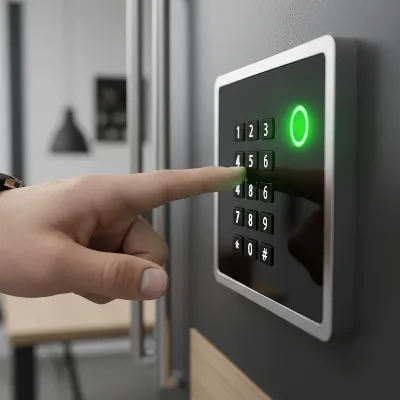 A close-up of a hand pressing buttons on a digital safe box keypad with an illuminated green light, indicating successful code entry.
Best Practices for Digital Safe Box Security
Changing your safe’s code is just one piece of the security puzzle. Adopting a few best practices will significantly enhance the protection of your valuables.
Choosing Strong Codes
A strong code is your first line of defense. When selecting a new code:
- Length: Aim for a code that is between 6 and 8 digits long, as these are significantly harder to guess or brute-force than shorter codes.
- Complexity: Avoid obvious patterns like “123456,” “111111,” or sequential numbers. Do not use personal information such as birth dates, anniversaries, phone numbers, or parts of your address.
- Memorability: Choose a code you can easily remember without having to write it down. A trick is to use a memorable phrase and take the first letter or number of each word.
- Uniqueness: Never use the same code for your safe that you use for other security systems (e.g., bank PINs, email passwords).
Regular Code Changes
For optimal security, it’s advisable to change your safe’s code periodically, ideally every 6 to 12 months. This practice minimizes the risk of unauthorized access, especially if your code has been shared or if you suspect it might have been compromised. Regular updates add a dynamic layer to your security strategy, keeping potential intruders on their toes.
Maintaining Your Safe
Proper maintenance extends the life of your safe and ensures its reliability.
- Battery Replacement: Digital safes rely on batteries. Replace them annually, or immediately when the low-battery indicator appears. Always use fresh, high-quality alkaline batteries. Never mix old and new batteries, or different battery types.
- Secure Storage of Override Keys: Keep any emergency override keys in a secure location away from the safe itself. This way, if the safe’s electronic system fails or you forget the code, you still have a way to access your valuables.
- Clean Keypad: Regularly wipe down the keypad to prevent fingerprint smudges from revealing frequently used numbers, which could give clues to your code.
- Proper Handling: Avoid slamming the safe door or forcing the handle, as this can damage the locking mechanism over time.
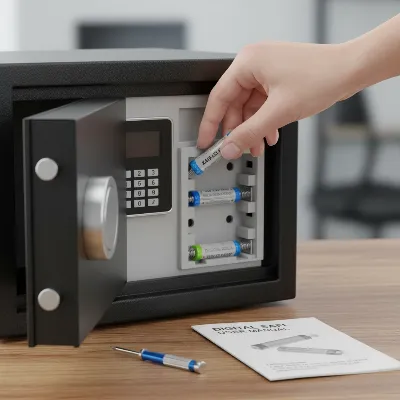 A hand replacing batteries in the compartment of a digital safe box, with other tools nearby.
Conclusion
Changing the code on your digital Safe Box is a simple yet vital task that significantly bolsters your security. By understanding the general steps, recognizing brand-specific nuances, and adhering to best practices like keeping the door open during programming and choosing strong, unique codes, you can ensure your valuables remain securely protected. Regular code updates and diligent maintenance are not just recommendations; they are cornerstones of a robust security strategy for any digital safe owner. Take the time to familiarize yourself with your safe’s specific instructions and make code changes a routine part of your security regimen.
Have you ever encountered a unique challenge when changing your safe’s code, and how did you resolve it?
Frequently Asked Questions
How often should I change my digital safe code?
It’s recommended to change your digital safe code at least once every 6 to 12 months, or immediately if you suspect the code has been compromised or shared with someone who no longer needs access.
What should I do if my digital safe batteries die and I don’t have the code?
If your digital safe batteries die and you’ve forgotten the code, first check for an emergency override key. Most safes come with one, often hidden behind a removable panel on the keypad. If no key is available, some safes have an external battery pack port, or you may need to contact the manufacturer or a professional locksmith.
Can I use letters in my digital safe code?
Most standard digital safe keypads only accept numerical inputs (0-9). However, some advanced models or smart safes integrated with apps might allow for alphanumeric codes. Always refer to your specific safe’s manual to confirm the supported character types.
My safe’s keypad is beeping constantly after changing the code. What does that mean?
Constant beeping after changing the code usually indicates an issue. It could mean the new code was not accepted, the batteries are low, or there’s a malfunction. Test the code with the door open, replace batteries, and if the problem persists, consult your manual or the manufacturer.
Is the factory code permanently stored in my safe?
For many digital safes, especially user-programmable ones, changing the code overwrites the factory default code, rendering it unusable. However, some higher-security safes or specific models might retain a master or factory override code that cannot be changed. Always check your safe’s manual for details.